0➡1的SpringCloud速通
什么是分布式微服务
拆分大系统为各个微服务,同一服务多节点部署。springcloud实现各远程服务的调用。
Nacos:服务发现
nacos服务端+微服务(注册)发现端
服务注册
1.依赖引入
spring-cloud-starter-alibaba-nacos-discovery
2.配置nacos服务端地址
application.properties中
spring.cloud.nacos.discovery.server-addr=127.0.0.1:8848
3.服务注册
@EnableDiscoveryClient //开启服务发现功能!!!
@SpringBootApplication
public class ProductMainApplication {
    public static void main(String[] args) {
        SpringApplication.run(ProductMainApplication.class, args);
    }
}
此时可在nacos可视化界面看见被注册的服务
4.服务发现
使用Spring Cloud Commons提供的DiscoveryClient
@Autowired
DiscoveryClient discoveryClient;
@Test
void discoveryClientTest(){
    //遍历服务
    for (String service : discoveryClient.getServices()) {
        System.out.println("service: " + service);
        //遍历各服务地址
        List<ServiceInstance> instances = discoveryClient.getInstances(service);
        for (ServiceInstance instance : instances) {
            System.out.println("ip:"+instance.getHost()+" port: " +instance.getPort());
        }
    }
}
使用nacos提供的NacosServiceDiscovery
@Autowired
NacosServiceDiscovery nacosServiceDiscovery;
@Test
void nacosServiceDiscoveryTest() throws NacosException {
    for (String service : nacosServiceDiscovery.getServices()) {
        System.out.println("service: " + service);
        List<ServiceInstance> instances = nacosServiceDiscovery.getInstances(service);
        for (ServiceInstance instance : instances) {
            System.out.println("ip:"+instance.getHost()+" port: "+instance.getPort());
        }
    }
}
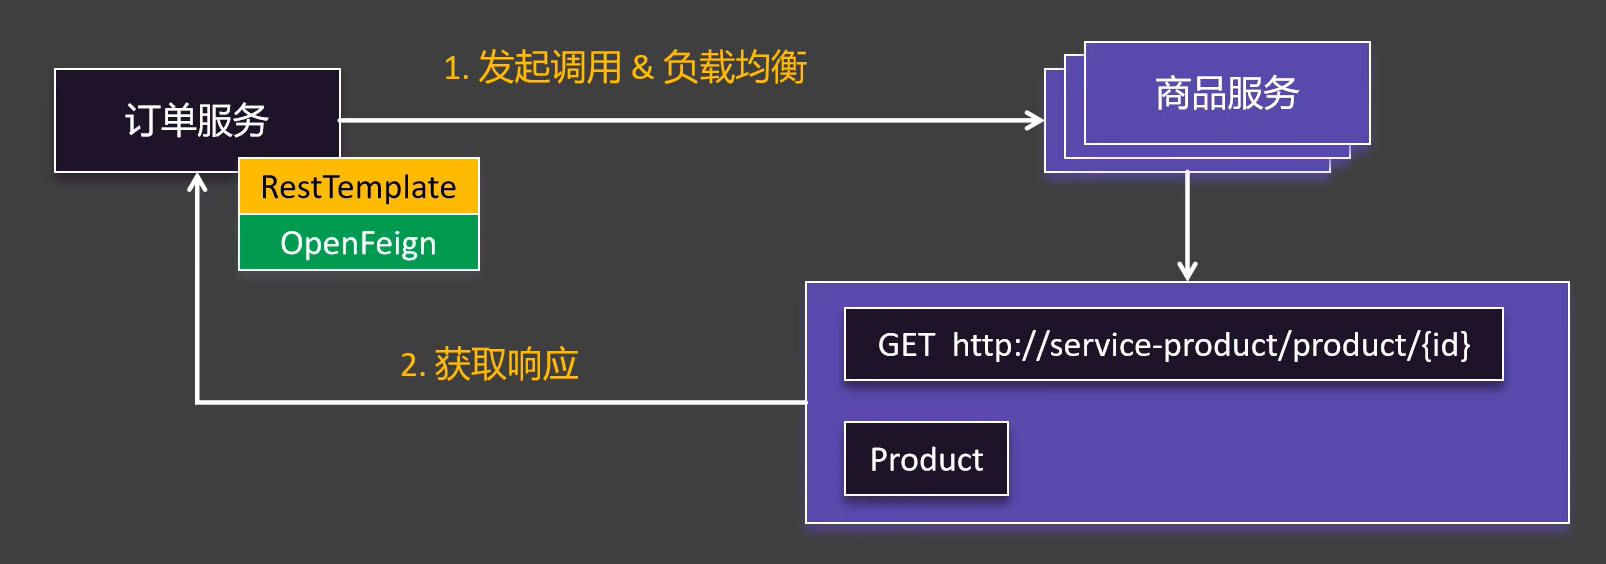
5.服务调用
使用远程调用类RestTemplate详解
创建Bean
@Configuration
public class UserConfiguration {
    @Bean
    RestTemplate restTemplate() {
        return new RestTemplate();
    }
}
调用接口
@Autowired
RestTemplate restTemplate;
@Test
void testRestTemplate() {
    String forObject = restTemplate.getForObject("http://localhost:8080/test", String.class);
    System.out.println(forObject);
}
负载均衡
加载依赖 <font style="color:rgb(38,44,49);">spring-cloud-starter-loadbalancer</font>
使用LoadBalancerClient类
将服务发现寻找服务地址部分替换为
//获取服务所有机器IP+port
ServiceInstance choose = loadBalancerClient.choose("service-product");
//获取请求地址
String url = "http://"+choose.getHost() +":" +choose.getPort() +"/product/"+productId;
使用@LoadBalanced注释
添加注释 <font style="color:rgb(38,44,49);">@</font><font style="color:rgb(35,41,48);">LoadBalanced</font>
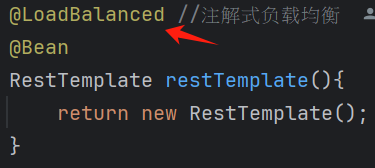
服务调用中service-product 将会被动态替换
String url = "http://service-product/product/"+productId;
Product product = restTemplate.getForObject(url, Product.class);
配置中心
引入依赖 <font style="color:rgb(38,44,49);">spring-cloud-starter-alibaba-nacos-config</font>
在 <font style="color:rgb(38,38,38);">application.properties</font> 配置nacos服务端地址后添加
spring.config.import=nacos:service-order.properties
使用@RefreshScope注解
在Controller类加上注解 <font style="color:rgb(38,44,49);">@</font><font style="color:rgb(35,41,48);">RefreshScope</font>
使用ConfigurationProperties注解(自动刷新)
在实体类中加上 <font style="color:rgb(38,44,49);">@</font><font style="color:rgb(35,41,48);">ConfigurationProperties</font><font style="color:rgb(38,44,49);">(</font><font style="color:rgb(35,41,48);">prefix </font><font style="color:rgb(225,0,35);">= </font><font style="color:rgb(0,47,109);">"order"</font><font style="color:rgb(38,44,49);">) </font>
配置批量绑定在nacos下,可以无需@RefreshScope就能实现自动刷新
NacosConfigManager
实时监听配置变化
@Bean
ApplicationRunner applicationRunner(NacosConfigManager manager){
    //函数式接口
    return args -> {
        ConfigService configService = manager.getConfigService();
        //选定要监听的服务和组别
        configService.addListener("service-order.properties", "DEFAULT_GROUP", new Listener() {
            @Override
            public Executor getExecutor() {
                //监听器在线程池中运行
                return Executors.newFixedThreadPool(4);
            }
            //接收到的监听信息
            @Override
            public void receiveConfigInfo(String configInfo) {
                System.out.println("configInfo = " + configInfo);
            }
        });
    };
}
配置分组
namespace 命名空间
实现多环境隔离,如:开发、测试、预发、生产等
dataId 数据集id
配置文件的名字。完整写法: <font style="color:rgb(38,38,38);">名字.后缀</font> 如: <font style="color:rgb(38,38,38);">common.properties</font>
groupId 分组id
一般用微服务自己的名字
OpenFeign:服务调用
无需手动编码,自动处理向服务发送请求的过程,简化HTTP调用(就是不再需要使用Nacos提供的类手动编写服务调用过程)
引入依赖
<font style="color:rgb(38,44,49);">spring-cloud-starter-openfeign</font>
在主函数入口加上注释 <font style="color:rgb(38,44,49);">@</font><font style="color:rgb(35,41,48);">EnableFeignClients</font>
调用在nacos注册的服务
创建OpenFeign客户端
Order服务中 com.example.order.feign.ProductFeignClient 接口
//指定Feign客户端
@FeignClient("stores")
public interface StoreClient {
    //MVC注解标注在FeignClient中,代表发送请求的地址
    @RequestMapping(method = RequestMethod.GET, value = "/stores")
    //Feign支持将调用返回的原始json解析为指定类
    List<Store> getStores();

    @GetMapping("/stores")
    Page<Store> getStores(Pageable pageable);

    @PostMapping(value = "/stores/{storeId}", consumes = "application/json",params = "mode=upsert")
    Store update(@PathVariable("storeId") Long storeId, Store store);

    @DeleteMapping("/stores/{storeId:\\d+}")
    void delete(@PathVariable Long storeId);
}
调用
在Controller中注入
@Autowired
ProductFeignClient productFeignClient;
即可直接使用
Product product = productFeignClient.getProductById(productId);
调用第三方Api
创建OpenFeign客户端
@FeignClient(value = "weather-client", url = "http://aliv18.data.moji.com")
public interface WeatherFeignClient {
    @PostMapping("/whapi/json/alicityweather/condition")
    String getWeather(@RequestHeader("Authorization") String auth,
                        @RequestParam("token") String token,
                        @RequestParam("cityld")string cityId);
}
注入接口后可直接调用
开启日志
Spring Cloud OpenFeign 功能 :: Spring Cloud Openfeign - Spring 框架
在 application.yml 配置
logging:
 level:
 com.atguigu.order.feign: debug
在 .config.OrderConfig 配置记录日志级别
@Configuration
public class FooConfiguration {
    @Bean
    Logger.Level feignLoggerLevel() {
        return Logger.Level.FULL;
    }
}
失败处理
超时控制
设置服务限时等待,单一服务不可用将不会导致其他服务陷入循环等待。在这种情况下不可用的服务返回错误信息/返回兜底数据。
<font style="color:rgb(25, 30, 30);">connectTimeout</font>防止因服务器长时间处理而阻塞调用者。默认10s<font style="color:rgb(25, 30, 30);">readTimeout</font>从连接建立时开始应用,并在返回响应花费太长时间时触发。默认60s
通过修改application文件修改某一服务的超时控制时间
失败重试
在容器 .config.OrderConfig 中配置bean
@Bean
Retryer retryer(){
    return new Retryer.Default();
}
请求拦截
OpenFeign提供的定制需求修改器
@Component
public class XTokenRequestInterceptor implements RequestInterceptor {
    //请求拦截器
    @Override
    public void apply(RequestTemplate template){
        System.out.println("XTokenRequestInterceptor .......");
        template.header("X-Token",UUID.randomUUID().tostring());
    }
}
Sentinel:服务保护
引入依赖 <font style="color:rgb(38,44,49);">spring-cloud-starter-alibaba-sentinel</font>
保护各种资源(自动获取项目中编写的web接口/手动注入SphU API或@SentinelResource)
根据自定规则(流量规则、熔断规则、来源规则等)放行流量
整合
启动控制面板jar包 <font style="color:rgb(38,38,38);">java -jar sentinel-dashboard.jar</font>
配置控制面板
spring:
 cloud:
  sentinel:
   transport:
    dashboard: localhost:8080
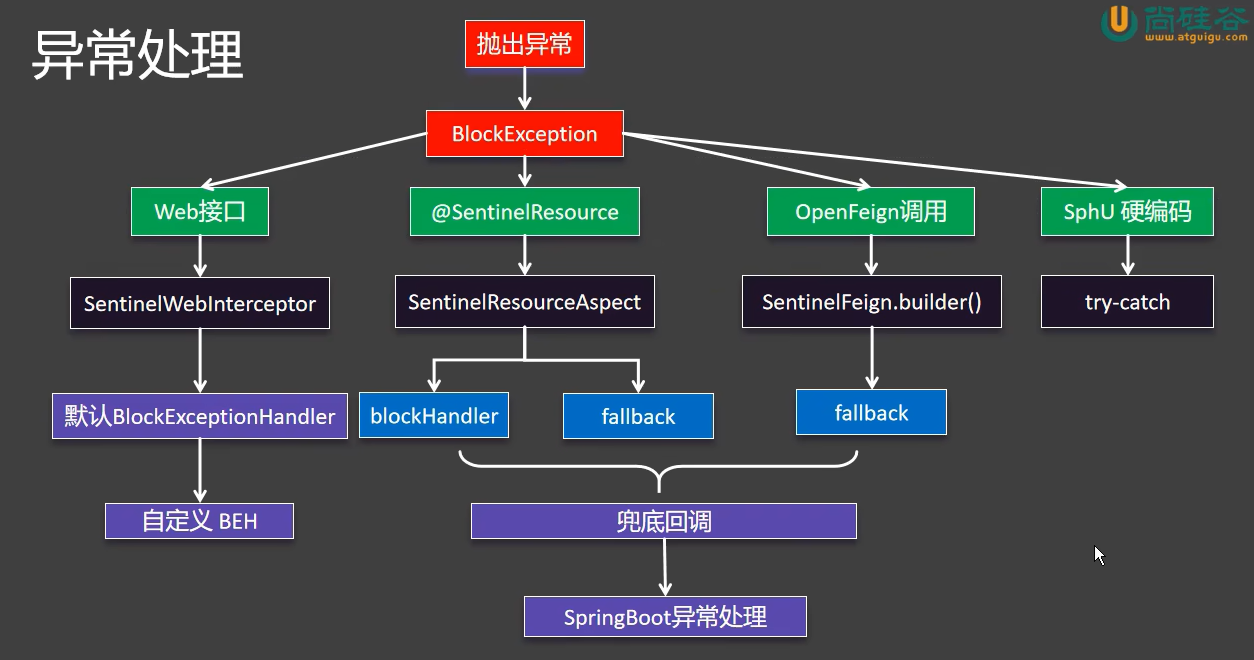
异常处理
basic-api-resource-rule | Sentinel
结合OpenFeign重写fallback
实现返回默认数据/返回缓存数据
开启熔断
feign:
 sentinel:
  enabled: true
编写fallback函数
@Component
public class ProductFeignClientFallback implements ProductFeignClient {
    @Override
    public Product getProductById(Long id) {
        System.out.println("兜底回调....");
        Product product = new Product();
        product.setId(id);
        product.setPrice(new BigDecimal("0"));
        product.setProductName("兜底商品");
        product.setNum(0);
        return product;
    }
}
将接口的错误回调指向fallback
@FeignClient(value = "service-product",fallback = ProductFeignClientFallback.class)
public interface ProductFeignClient {
    ...
}
对web接口使用自定义BlockExceptionHandler处理异常
默认的BlockExceptionHandler只输出一行string而非json,通过自定义可修改
.exception.MyBlockExceptionHandler
@Component
public class MyBlockExceptionHandler implements BlockExceptionHandler {
    private ObjectMapper objectMapper = new ObjectMapper();
    @Override
    public void handle(HttpServletRequest request, HttpServletResponse response,
                        String resourceName, BlockException e) throws Exception {
        response.setStatus(429); //too many requests
        response.setContentType("application/json;charset=utf-8");
        PrintWriter writer = response.getWriter();
        //提前自定义返回数据类
        R error = R.error(500, resourceName + " 被Sentinel限制了,原因:" +e.getClass());
        String json = objectMapper.writeValueAsString(error);
        writer.write(json);
        writer.flush();
        writer.close();
     }
}
对@SentinelResource资源使用blockHandler处理异常
.service.OrderServiceImpl
//指定异常处理器
@SentinelResource(value = "createOrder",blockHandler = "createOrderFallback")
@Override
    public Order createOrder(Long productId, Long userId) {
    // Product product = getProductFromRemoteWithLoadBalanceAnnotation(productId);
    //使用Feign完成远程调用
    Product product = productFeignClient.getProductById(productId);
    Order order = new Order();
    order.setId(1L);
    // 总金额
    order.setTotalAmount(product.getPrice().multiply(new BigDecimal(product.getNum())));
    order.setUserId(userId);
    order.setNickName("zhangsan");
    order.setAddress("china");
    //远程查询商品列表
    order.setProductList(Arrays.asList(product));
    return order;
}

//兜底回调
public Order createOrderFallback(Long productId, Long userId, BlockException e){
    Order order = new Order();
    order.setId(0L);
    order.setTotalAmount(new BigDecimal("0"));
    order.setUserId(userId);
    order.setNickName("未知用户");
    order.setAddress("异常信息:"+e.getClass());
    return order;
}
编写SphU调用
try {
    //资源名称
    AsyncEntry entry = SphU.asyncEntry(resourceName);

    // 异步调用.
    doAsync(userId, result -> {
        try {
            // 在此处处理异步调用的结果.
        } finally {
            // 在回调结束后 exit.
            entry.exit();
        }
    });
} catch (BlockException ex) {
    //如果流量超过限制抛出错误,进行处理
}
规则限制
流量控制FlowRule
限制多余请求,防止系统资源被耗尽。
根据流控模式判断某一服务的请求是否超过阈值,若超过则产生流控效果
阈值类型
QPS:统计每秒请求数 (一般选用)
并发线程数:统计并发线程数
流控模式
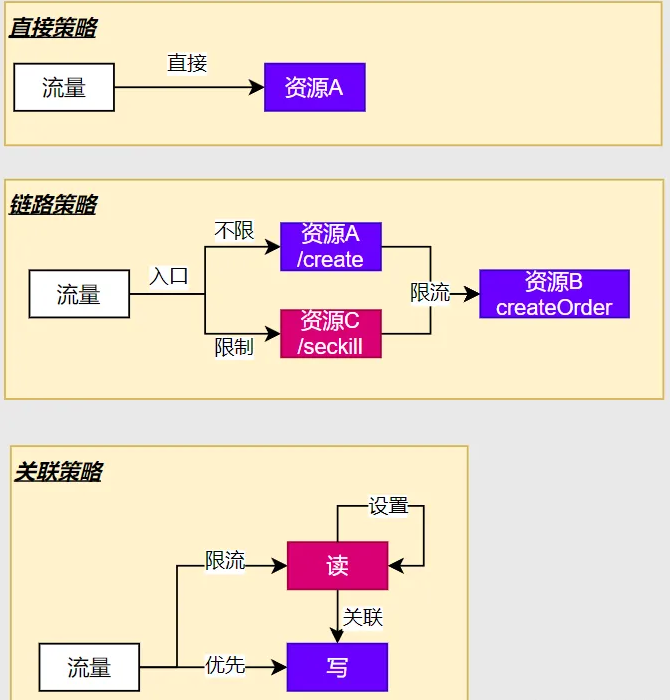
链路策略:仅对某一访问路径生效
关联策略:优先分配资源给重要功能
流控效果

快速失败:抛出 BlockException 异常,若有 BlockExceptionHandler 则安装自定义的步骤处理异常
冷启动:逐步启动,使程序逐步适应 QPS-单机阈值 Period-启动周期
匀速排队:在快速失败基础上不直接丢弃请求,而是放入排队队列中等候执行。当排队时长超出服务timeout时长再被丢弃。